

Olympus 25mm f1.2 Pro Review
Len has just spent a month with his Olympus M.Zukio 25mm f 1.2 Pro Lens, and in this review he discusses his observations. He also shows direct comparison with the Olympus 25mm f1.8 lens and the Voitlander 25mm f 0.95 lens.
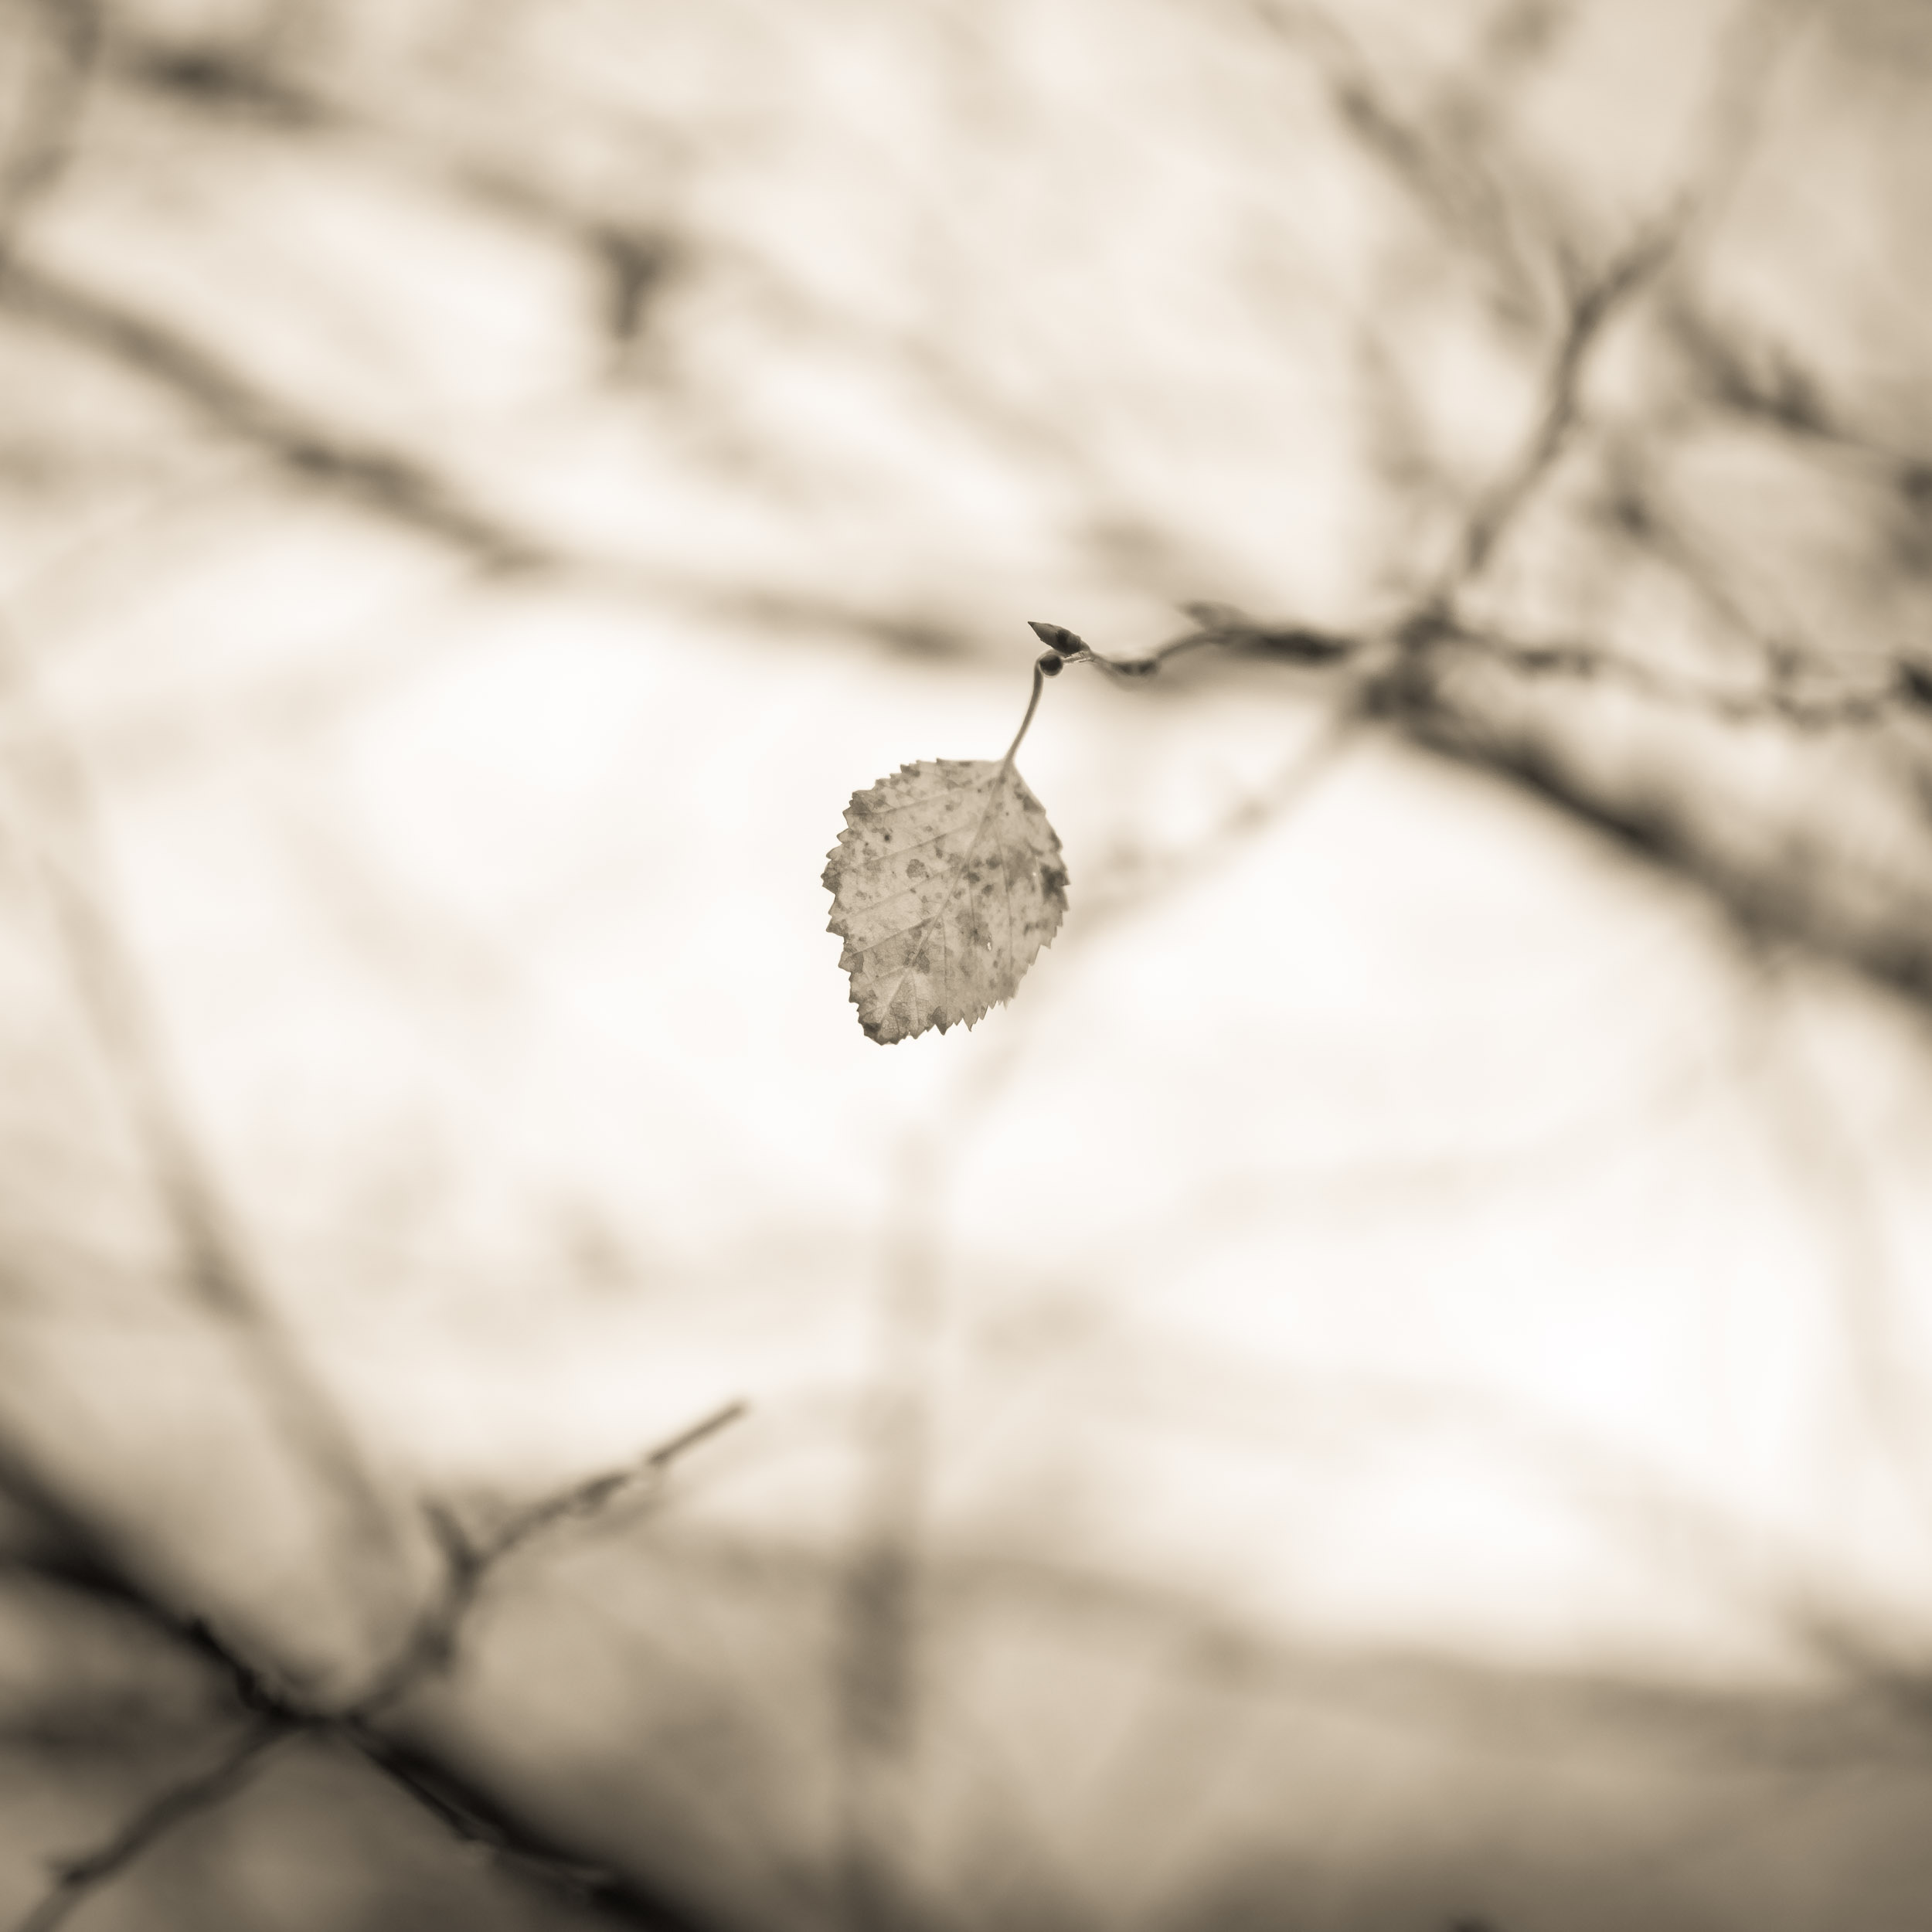
Scotland pine forest, plantation that will be replaced with the areas natural trees in the near future. Olympus EM-1 & Olympus 25mm f1.2 shot handheld @ 1/10 second, f 5.6 1600 ISO
I was able to pick up an early copy of the new Olympus M.Zukio 25mm f 1.2 Pro lens designed for micro four thirds. It is a large heavy lens, it feels a little more bulky than my Voitlander 25mm f 0.95 lens which has been my favourite micro four thirds lens for the past seven years. It was clearly my favourite lens with over 95% of all of my digital photographs being taken with that lens. It had its faults, namely the jittery or nervous bokeh, the ultra soft and often too soft rendering wide open with a bit of haloing going on. And it wasn't weather proof. I used that lens in the rain, and it did suffer. It would eventually fog up internally, the aperture would get gritty, and I would have to stop working.
I purchased the 12mm - 40mm f2.4 Olympus Pro Zoom so I could work in the rain, but unfortunately zooms and I don't get on too well.
When the Olympus was rumoured to be of Pro quality and hence weather proofed I knew it was a lens I wanted. I put my pre order in the day it was announced. Picked up as soon as it was available at the store. It has hardly come off since I purchased it. So here are my first impressions.
The good...
It is weather proof - my primary reason for buying this lens
It has the same filter size as the other Pro lenses 62mm
It has a great lens hood. It shelters the lens from rain quite effectively. It has a different clip system than Olympus has given us before and it works very well.
The lens has an amazingly beautiful out of focus areas, at all apertures. The bokeh is delicious. Have a look at the photographs. It simply is stunning.
The lens is sharp. I look forward to seeing some tests to confirm my suspicions that this lens was designed for the new high-resolution modes on the Olympus cameras and will easily out resolve the current sensor technology.
It is sharp to the edges that I use, when I shoot square.
The resolution seems to be fantastic from f2.4 through to f 8.0 other f stops are very usable. I wouldn't worry myself about only using the sharpest f stops and I would use all of them.
It is a stunning portrait lens, it works beautifully with nudes as well.
It has the start of swirly bokeh at f 1.2 reminiscent of Petzval lenses such as the famed French Darlot. It only shows itself when the conditions are just right. This is when the out of focus lines follow the circumference of the lens. (there is probably a better way to describe this, suggestions welcome)
I can focus it manually without having to zoom in to see the focus in the viewfinder. This is a very important issue for me, as the Voitlander lens that the Olympus replaces snaps into clear focus. I prefer using manual focus all the time.
I love the 25mm focal length, and this lens is just a joy to use and look at images taken with it.
and the bad...
It is a bulky lens
The micro contrast is gentle and shows less contrast than my other 25mm micro four thirds lenses. I think smoothness topped sharpness when this lens was designed.
The sharp roll-off from the sharp to the blur is quite pronounced. I am noticing I have to stop the lens down further than I did with my previous lens. It is more of an adjustment in my working practices rather than really a disadvantage
It is on the expensive side, but considering what you are getting I think it is worth the money.
It is more of a portrait lens when shot wide open than a landscape lens, but once I stop it down I don't notice any more.
It is expensive & the 25mm f 1.8 is almost as good at many landscape photographers working apertures.
Sometimes in manual focus, when the focus clutch is pulled back for manual focus, the lens becomes disengaged from the focus by wire mechanism. This happened to me on a number of occasions on cold mornings, and was quickly fixed by disengaging the clutch and then reengaging it again. I hope this doesn't continue.
The close focus distance isn't as close as my Voitlander 25mm f 0.95, so that means I will have to carry my 60 mm macro around a bit more I suspect.
Sharp enough for me
So far the prints that I have made from this lens are outstanding, and are indistinguishable in sharpness from my standard reference lens the Voitlander 25mm f0.95 shot at 2.8 hit 82 lpmm. My camera only resolves about 52 lpmm. I don't know exactly how sharp this lens is, but I can't tell the difference in my prints and that is all that matters.


Beautiful out of focus areas


Beautiful results with figures
Andrea poses for our Fine Art Nude Workshop where we explored natural light nudes. Olympus 25mm f 1.2 shot at f5.6
Ama poses for the Fine Art Nude Photography Workshop, held in the Blue Mountains. Olympus 25mm f 1.2 shot at f2.5
Comparing between apertures


Comparisons at different f stops
The Olympus 25mm f1.2 shot at f1.2 on the left and f 5.6 on the right. Here I can see a sharpness difference with the lens being slightly softer wide open. Notice how the micro contrast improves as the lens shuts down. I suspect this lens has been consciously optimised for portaits.
The Olympus 25mm f1.2 shot at f1.2 on the left and 5.6 on the right. There is definitely a difference in sharpness, with the lens being softer wide open. This is to be expected in my humble opinion.
Is that swirly bokeh I see?


Comparisons between the Voitlander 25mm f 0.95, the Olympus 25mm F1.2 and the f1.8 lenses
Olympus 25mm f1.2 on left and Voitlander 25mm f0.95 on right both shot at f 1.8 - The Voitlander has better micro contrast, while the Olympus has smoother bokeh. I can't pick the difference in sharpness.
Olympus 25mm f1.2 on left and Voitlander 25mm f0.95 on right both shot at f 2.8 - The Voitlander has better micro contrast, while the Olympus has smoother bokeh. I can't pick the difference in sharpness.
Olympus 25mm f1.2 on left and Voitlander 25mm f0.95 on right both shot at f 11 - The Voitlander is now a little softer, with micro contrast dropping off as well.
Olympus 25mm f1.2 on left and Olympus 25mm f1.8 on right both shot at f 1.8 - The f1.8 appears to have better micro contrast, while the f1.2 Pro version has smoother out of focus areas. I can't pick the difference in sharpness.
Olympus 25mm f1.2 on left and Olympus 25mm f1.8 on right both shot at f 5.6 - Now I am really struggling to see the differences. The 1.2 now has lovely micro contrast, it still has a little smoother out of focus areas.
Notice the difference between the Olympus 1.2 on the left and the Voitlander 0.95 on the right
The Olympus 25mm f 1.2 has a beautiful soft bokeh, it renders out of focus areas beautifully. Compare this with the image on the right, note how jittery the figure is. I would describe this as a nervous bokeh.


Field of view differences between 25mm lenses
Olympus 25mm f 1.2 on the left, Olympus 25mm f 1.8 middle, Voitlander 25mm f 0.95 right. Despite the same focal length the lenses all have a slightly different angle of view. Note, these are shown in the order they were taken. I used my large format heavy duty tripod designed to take 15 kgs, so the tripod didn't move.
How close can you go?
All set at the minimum focus distance. Olympus 25mm f 1.2 left, Olympus 25mm f 1.8 centre, Voitlander 25mm f 0.95 right, all shot at f 2.0 - note I have increased the clarity on all of these to make it easier to see the areas in focus.
A few more to whet your appetite
Scotland... just stunning... Olympus 25mm f 1.2 @ f 6.3
@ f6.3 in case you were wondering... shot with an EM-1 & the Olympus 25mm f 1.2
CONCLUSIONS
This is a unique lens and it fits in well in my arsenal of lenses. It has its quirks. Namely, I am finding I need to stop it down a little more than my previous 25 mm. I have been out shooting with this lens in the pouring rain, and that has already made this lens a firm favourite. Not having to hold an umbrella over my camera to work is a god send. It is so appreciated. The swirly bokeh is quite cute when it comes. The soft gentle bokeh is a delight to utilise in my work. It is just gorgeous. The lens appears sharp across the whole frame, well the bits I use anyway. Yes that is an advantage of shooting square, I get to use the best bit of the lens for all of my work. I have to add vignette in post processing, as I never see any.
This lens is a delight to use in manual mode. Apparently it focuses quickly, but I haven't noticed that as I it has rarely been there for me.
I doubt that my Voitlander will see much use now, and this lens is destined to become my favourite. Time will tell, but after the last month with this lens I haven't felt the need to return to my stalwart lens.
I think Olympus has produced a fantastic beautiful and functional lens, that will suit those of us who love the nifty fifty focal length.
NOTES
All photographs are taken with an Olympus EM-1 micro four thirds camera
All images have been shot in raw, and processed in Lightroom
I haven't used any of the lightroom lens corrections or presets
I usually use tripods, a very heavy one, though I do a lot of handheld work too. This little review has shots taken both ways.
If you come across any sharpness tests please let me know.
Most of the photographs in this review are clickable to see a large on screen version.
Thanks for taking the time to read to the end..
I run photographic workshops in Australia, come and join me one day...

choosing a mirrorless camera
John wrote to me yesterday and asked me for some advice about choosing a Mirrorless camera. I started writing back to him, and thought I should turn this into a blog post about my current thoughts on which cameras to consider when going mirrorless.
Wabi Sabi - Hopewell, New Zealand, Olympus OM-D EM-1, Voitlander 25mm f0.95 lens © Len Metcalf 2016
On Friday, 11 March 2016, <john> wrote:
Hi Len
My name is John and I live in Abbotsford Sydney.
I have and am enjoying your photography. Your images are wonderful.
A question that you must be asked by so many, but please forgive the question again.
I know that the most important ingredient to capturing an image is the person behind the camera and the available light. I have been looking to purchase a mirror less camera and the choice is quite bewildering. So many different opinions. I am enjoying your images and am wondering if you can give me some advice re this choice. I would appreciate any help that you could send my way.
Kind Regards
John
Dear John,
The first question you need to ask yourself is what sort of photographs you would like to take? If tracking of sports athletes is a high priority then Mirrorless may not be the right choice. Would you like a range of zoom lenses or a set of primes. Is weight and size your highest priority?
The second question is how big will you print? As this can sway your choice with the number of mega pixels becoming important. If you never plan to print larger than A2 with the majority of your prints at A3 then 16 mega pixels is more than sufficient. Actually ten was more than enough for my work.
Personally I am very biased towards Micro Four Thirds because it is an open mount. Meaning that any manufacturer is welcome to join and make cameras or lenses. I think this is admirable in a world where competitors try to keep you tied into their brand by forcing you to lock into their system. Because of this you have the widest range of cameras and lenses of any other mirror less system. For ethical reasons alone Micro Four Thirds is a sound choice. I find the lenses and bodies a lovely compromise between size, sharpness and quality. I always hoped some other camera manufacturers would come on board such as Fuji, Leica and Sony or lens makers like Zeiss, but alas they have chosen their own paths.
The Micro Four Thirds system clearly has the best and most comprehensive lens choice in any of the Mirrorless systems with around 70-100 lenses to choose from. I must admit I don't know how many there are. I started counting and stopped at fifty and still wasn't close. There is a list on this page here.
I am also biased towards in camera image stabilisation. It works very very well and it can be used on any lens. I can hand hold at half a second and get a reasonable photograph. It is just so fantastic for people that have trouble hand-holding.
Olympus is by far my favourite mirror less camera manufacturer. My love affair with their cameras started with my OM-1, my first slr. My first camera I loved. It was the first compact slr and it is no coincidence that its dimensions closely matched the Leica M3 as it is also a lovely camera to hold and use.
In Micro For Thirds their cameras are a firm favourite for still photography. The sensor based image stabilisation system is outstanding and for that alone their cameras lead the pack. Some of the cameras are too small and benefit from extra grips. I always buy the Really Right Stuff camera plates and add them to the camera. The EM-5's handling substantially improves with their extra grip. The EM-1 with the Really Right Stuff base plate extends the camera body just enough to get my little finger around it which makes the camera very comfortable in my large hands. For all day use the EM-1 is my preferred camera, and for walking where every ounce counts I like the EM-5 mk2, which is also my preferred camera for videoing as it has a headphone jack in the extra grip so I can monitor my audio input levels.
The Panasonic cameras are well known for their beautiful colour renditions and their high quality video. One of their latest models now includes sensor based image stabilisation. A huge improvement which I hope to see on all their future cameras. I can't comment on their use as I have never used one. You tend to find that Micro Four Thirds users are either in the Olympus or Panasonic camps and won't consider the other. A few members of my family have Panasonic cameras who aren't very serious photographers so they shoot in jpg and print or share their work. The colours and photographs from the Panasonic cameras is always outstanding. So I have no reason to doubt their quality. It was that the image stabilisation system they initially developed didn't work with my favourite lenses.
Fuji has a solid range of mirror less cameras. They are renowned for their beautiful colour rendition and and lovely lenses. They use a very different sensor array. The colours are layer out differently and therefore many third party image processing engines used to struggle with processing their raw files. So make sure you check this out before going ahead with Fuji. Some may find their lens choice limiting while others say it sufficient. Fuji cameras are very popular among street shooters as there are a few models that have hybrid viewfinders that allow for either electronic or optical and both mixed together. A feature that isn't seen in any other manufacturers cameras.
Sony's latest mirror less offerings now have sensor based image stabilisation. They apparently work equally as well as the Olympus ones. My theory is that they bought half of the company just to get this technology then sold it on latter once they had it. There are few lenses to choose from and the lenses are much larger than Micro Four Thirds. So you may find you end up with a heavier kit. Many of my students went to a shop to buy an Olympus and came back with a Sony. I think the full frame and large mega pixel count is an easy up sell (the camera store makes more money when you buy a more expensive system). You will be spending 2 - 3 times as much money as you would on an equivalent Micro Four Thirds kit when you consider the lenses. It would end up being nearly twice as heavy overall too. Mind you these students who have gone with the Sony love them dearly and haven't ever looked back. There is plenty of room if you want to crop. They also make an amazing low light camera that has great high ISO capabilities. The Sony system has limited lens choice so consider if they have the lenses you want before committing to it.
I haven't looked at the Canon or Nikon offerings in Mirrorless much as they seem to be very limited with lenses.
The new Sigma Quatro looks interesting, though only a few lenses might be limiting. The Samsung Mirrorless System didn't pass the economic test of time.
The only other Mirror less camera I would consider is the Alpa / Phase One A-Series combination which I actually lust over. When I can afford the price of it yes I would love to use it, but alas for now the plus price tags put it firmly in the 'Len you're dreaming' category.
When buying a new camera I now start with the lenses, for the most interesting and desirable camera in the world is useless to me unless I can find an as equally desirable lens. I have written an article on my thoughts for Micro Four Thirds lens choices, which you can read here.
I have another article brewing in my head comparing full frame with micro four thirds, with the advantages going to micro four thirds. After the last nine months with a full frame DSLR, my conclusion is that it is not worth the pain it causes. ;)
I wish you well in your search and purchases
Kindest regards
Len

including stars in your landscapes
Len describes how to add stars to your photographs with some tips on astrophotography.
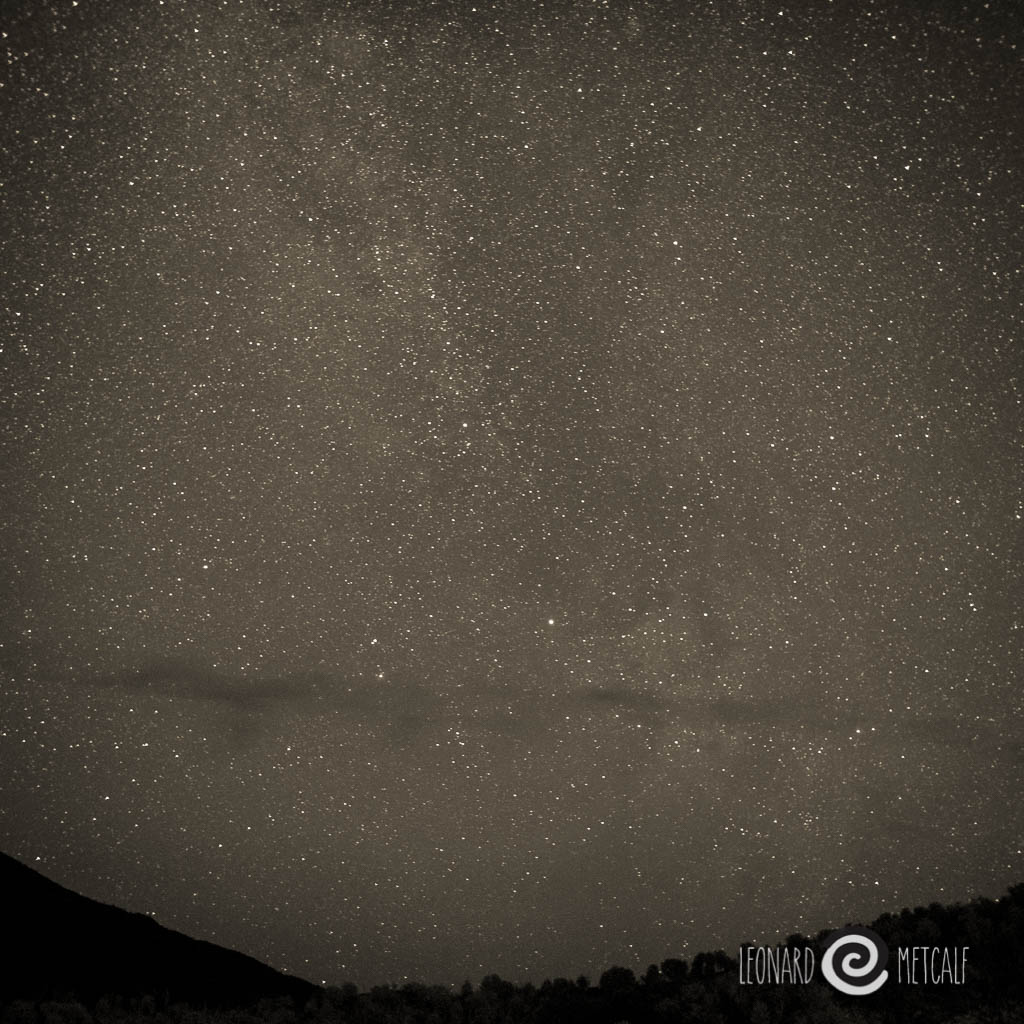
Arkaroola Starry Night - The Gammon Ranges / Flinders Ranges, South Australia
Astrophotography is taking photographs at night. In this short set of notes we will look at getting acceptably sharp stars in our photographs using the 500 rule. We will be limited by your equipment and locations. Firstly you need to be somewhere away from cities and bright lights. Much like the places they build observatories. The city lights reduce our ability to see the stars as they reflect off the atmosphere reducing the amount of light that gets through, which effectively reduces the amount of stars in our photographs. So go bush dear friends, and find a clear night sky.
Next you will need a fast lens. F1.2 to f1.4 will work best. You may get away with a f 2.8 lens. Any slower and this won't work. Don't have an f 1.4 lens yet? Why not, for their price they are one of the most important lenses in your kit. They are sharp, fast and relatively cheap. Go for a standard one. 50 mm equivalent on 35 mm is the one recommend and is my personal favourite. It was always the lens they used to see with a film slr before zooms became popular. There is a reason for this, and that is they are cheap to make and have outstanding performance. They also can be made to look wide angle and telephoto in skillful hands. For the last three years I lived with one lens, and a 50 mm equivalent was it. I can frame my shot without a camera for this lens now. An amazing thing that helps me take great photographs.
You camera needs a few characteristics too. Firstly you need to be able to shoot at 15 - 30 seconds. Sometimes you may need to go past a minute. Secondly you need a camera that works well at higher ISO's, in the 1000 to 6400 range. Lastly you need a tripod and a way to fire the camera without introducing vibration. If you have an SLR you will need to lock the mirror up and use a cable release. With mirrorless cameras you can just use a delay. I use the two second one, but I do have a very solid tripod designed for a very heavy large format camera, so my camera is very solid on it.
To focus your camera just focus on infinity. Close enough to those stars I suspect ;)
Shoot RAW and worry about white balance latter. Put your long exposure noise reduction on or set to auto. This will take longer when you as now your camera will take a second photograph of blackness with the shutter closed after your first photograph, and subtract the hot white pixels from your original exposure. This is called a dark frame subtraction and reduces noise in your final image. Well worth the wait in my opinion.
The way to figure out exposure is by trial and error. So I just dial in the following settings, take one photograph and then adjust my settings for optimum picture quality. I like to bring my ISO down to keep the noise low.
I would start with a 10 second exposure at f 1.4 at 3600 ISO
When considering exposure I like my night photographs to look like night, so I often drop the exposure to make them a little darker. I prefer to do this post processing though. You will also need to consider the moon and this will effect your final exposure.
To figure out what the longest shutter speed you can use with your lens use the '500 rule'.
500 divided by focal length in 35mm equivalent = maximum shutter speed in seconds for sharp stars.
So with my 25 mm lens on my micro four thirds camera is a 50 mm equivalent.
500 / 50 = 10 seconds
Now you can hopefully see how I determined my exposure.
The wider the lens the longer you will have.
Go and practice. Lots experiments the next time you get away from the city.
10 rules for teaching
“Do not fear to be eccentric in opinion, for every opinion now accepted was once eccentric.”
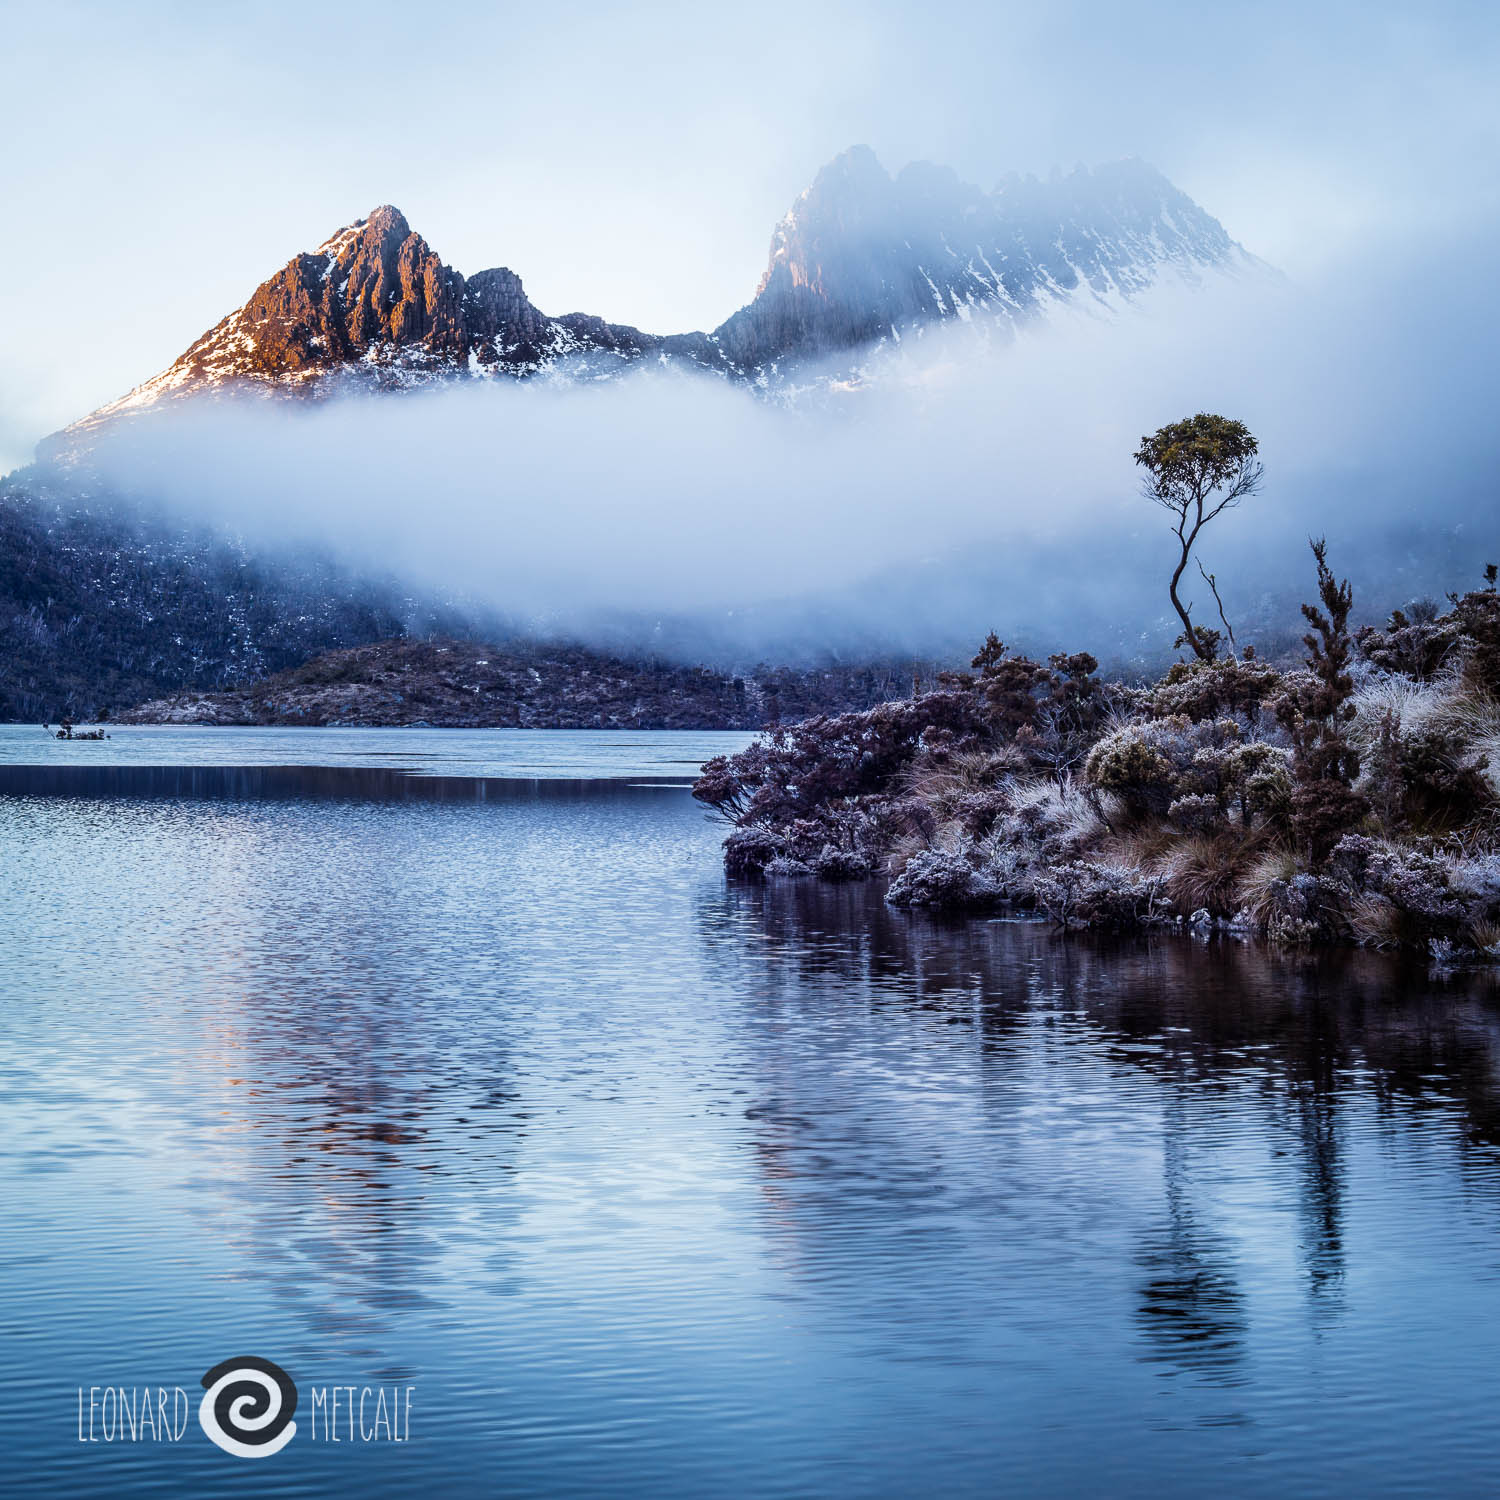
Enchanted Forest floor, Cradle Mountain, Tasmania © Len Metcalf 2015
Perhaps the essence of the Liberal outlook could be summed up in a new decalogue, not intended to replace the old one but only to supplement it. The Ten Commandments that, as a teacher, I should wish to promulgate, might be set forth as follows:
Do not feel absolutely certain of anything.
Do not think it worth while to proceed by concealing evidence, for the evidence is sure to come to light.
Never try to discourage thinking for you are sure to succeed.
When you meet with opposition, even if it should be from your husband or your children, endeavor to overcome it by argument and not by authority, for a victory dependent upon authority is unreal and illusory.
Have no respect for the authority of others, for there are always contrary authorities to be found.
Do not use power to suppress opinions you think pernicious, for if you do the opinions will suppress you.
Do not fear to be eccentric in opinion, for every opinion now accepted was once eccentric.
Find more pleasure in intelligent dissent than in passive agreement, for, if you value intelligence as you should, the former implies a deeper agreement than the latter.
Be scrupulously truthful, even if the truth is inconvenient, for it is more inconvenient when you try to conceal it.
Do not feel envious of the happiness of those who live in a fool’s paradise, for only a fool will think that it is happiness.
The Autobiography of Bertrand Russell
Sourced from Brain Pickings
10 rules for students
“Nothing is a mistake. There’s no win and no fail, there’s only make.”
Dove Lake & Cradle Mountain © Len Metcalf 2015
“Nothing is a mistake. There’s no win and no fail, there’s only make.”
RULE ONE: Find a place you trust, and then try trusting it for awhile.
RULE TWO: General duties of a student — pull everything out of your teacher; pull everything out of your fellow students.
RULE THREE: General duties of a teacher — pull everything out of your students.
RULE FOUR: Consider everything an experiment.
RULE FIVE: Be self-disciplined — this means finding someone wise or smart and choosing to follow them. To be disciplined is to follow in a good way. To be self-disciplined is to follow in a better way.
RULE SIX: Nothing is a mistake. There’s no win and no fail, there’s only make.
RULE SEVEN: The only rule is work. If you work it will lead to something. It’s the people who do all of the work all of the time who eventually catch on to things.
RULE EIGHT: Don’t try to create and analyze at the same time. They’re different processes.
RULE NINE: Be happy whenever you can manage it. Enjoy yourself. It’s lighter than you think.
RULE TEN: “We’re breaking all the rules. Even our own rules. And how do we do that? By leaving plenty of room for X quantities.” (John Cage)
HINTS: Always be around. Come or go to everything. Always go to classes. Read anything you can get your hands on. Look at movies carefully, often. Save everything — it might come in handy later.
Sister Corita Kent, Learning by Heart: Teachings to Free the Creative Spirit
Sourced from Brain Pickings.

Micro Four Thirds, Len's favorites
These days there is a bewildering amount of Micro Four Thirds lenses to choose from. Here I discuss my favorites and a couple of my recommendations.
Breaking mist above the Fish River, The Greater Blue Mountains World Heritage Area. © Leonard Metcalf 2015 - This photograph was one of the very first taken during my first full day with my Voitlander 25mm f0.95 lens, my firm favorite go to lens. It was with this photograph that my love for digital photography blossomed.
Micro four thirds lenses now come from a plethora of manufacturers in a bewildering range of focal lengths. I get regularly asked which lenses should I buy for my micro four thirds camera. Rather than go through the whole gamut of choices, I will outline my favorites, illustrate with examples from them and finish up with a few recommendations that are still on my wish list. I have listed them in my own preferential order, starting my my favorites and moving through to my wish list. This is not really a lens review, but just the musings of what seems to work for me.
Voitlander 25mm f0.95
This is the lens that changed my perception of what is possible with digital cameras. Before this lens landed in my hands, my digital photographs were lack lustre. The kit zoom on my Olympus E-3 was a 12 - 60mm pro series lens, yet the images just didn't sing. When the opportunity arose to move away from this camera and lens combination I was quick to dump it.
Sands, Lake Mungo National Park. Voitlander 25mm f 0.95 © Leonard Metcalf 2014
My first photographs with a micro four thirds camera were similar. In many ways it was the auto focus that caught me out. A manual focus lens took me back to my roots as a photographer. It gave me back my choice and decision making. In turn it led to better images. When I scan back through my Lightroom catalogue, there is a clear and abrupt improvement of my digital photography the moment I picked up this lens. Even today it is my go to lens. I don't leave home without it. It lives on my camera. Part of this obsession with this lens is the normal focal length which is the one I seem to prefer to see with. You might like to read further about the benefits of the "Nifty Fifty" in my previous article.
This lens is not for the faint of heart. It is slow to use. It is heavy with its all metal construction. The lens shade and matching lens cap are to die for. Actually the system is so good that I stop to wonder why others don't use it. It is slow to use, because I can only focus it wide open, and the aperture is manual. This means that I have to manually open it up, focus the lens and then close it down again to shoot. This lens does not have any electrical contacts and makes no communication with the camera. For this reason I tend to shoot with it on aperture priority. Manual doesn't work for me, as I close the lens down by feel. A couple of clicks if I want something reasonably sharp, and a few more when I want depth of field. It is impossible for me to recall what f stop I have been using. I could if I wrote them down, but I don't.
Slowing me down, making my own decisions equals better images. In my mind it is a simple choice. This lens wins nearly every time for me.
Highland Golden Moths Orchid ( Diuris monticola) Snowy Mountains. - Voitlander 25mm f0.95 Copyright © Leonard Metcalf 2014
It is a beautifully sharp lens. Even wide open I am more than happy with the look it gives, despite its paper thin plane of focus. Yes it falls off dramatically when wide open, but that really isn't the point of using it wide open is it. It is about beautiful out of focus areas. It appears dreamy when used wide open. I must admit I do prefer it stopped down a couple of clicks, when the depth of field thickens slightly, and the sharpness clearly improves. by f 2.0 it is amazingly pin sharp. At f 2.8 it has peaked, usable at 5.6 and by f 8 it is starting to fail again. So I rarely go past f 5.6.
This lens gets me amazingly close to my subjects. While not a macro by any stretch of my imagination, it does let me get close enough to photograph the stunning tiny Australian Orchids that I so love to find and play with.
At f 5.6 the depth of field is stunning. So good in fact that I don't really miss the tilts and swings of my large format view camera, even when doing the near foreground and distance shots that I loved doing utilising the scheimpflug rules I learnt at art school and obsessively used for twenty years.
When I stop this lens down to 2.8 it is amazingly sharp. When I use it with a tripod I am easily able to enlarge my 16 megapixel images to 24 x 30 inches using perfect resize for stunning results. The prints from this lens are stunning.
My only criticism of this lens is that the bokeh at some apertures can be rather disconcerting. Even unpleasant to my eye. Bokeh is stunning wide open, but something happens as it is stopped down. Then again if I am shooting for beautiful bokeh then I am shooting wide open or just stopped down a stop or two, so this is something that only concerns me on rare occasions. On these occasions I bracket my apertures and pick the best image at full size on my gorgeous large monitor at home.
Olympus 25mm f 1.8
For price, convenience and size this is my first auto focus lens recommendation. This is the first lens I recommend to all of my students, who wish to push themselves with the discipline that a nifty fifty requires. I carry one of these small beauties with me just in case my Voitlander 25mm is damaged or lost.
Lochlies Pylon, The Greater Blue Mountains World Heritage Area, Olympus 25mm f 1.8 © Leonard Metcalf 2015
It is as almost equally as sharp as the Voitlander. Sharpness with this lens peaks at f 4.0
It is light and small, and cheap. I keep it on my spare body, and often take it with me on excursions when I wish to leave my favorite heavier camera and lens combination at home.
Being auto focus, I can use it with the near eye focusing for stunning portraits. If I wasn't in love with the Voitalnder this would be my other choice of go to lens. As you can already tell, I have a very strong preference for prime lenses, and this article reinforces this preference.
Olympus 75mm f 1.8 ED
This lens is my other lover. It is my second most favored lens in my kit. The 150mm equivalent focal length is just stunning to work with. It reaches in. It allows me to keep my distance from the subject. It has beautiful Bokeh when used wide open.
Salt bush, Broken Hill Olympus 75 mm f 1.8 © Leonard Metcalf 2015
It is a heavy large lens. Well, when I compare it with the Olympus 25 mm or the 45 mm. It is also pricey. But well worth it. Particularly if you are fond of shooting portraits, or animals.
It doesn't come with a lens hood. I bought a cheap one from China, which has turned out to be rather useless. Even the Olympus one has a tightening screw on it. A method of attaching lens hoods left over from the seventies and eighties. Definitely not my preference for use. I would love Olympus to have included one of those sliding lens hoods that came with my Zuiko 200mm f 2.0 telephoto I was in love with in my teenage years, or the very sexy and practical one on the latest Olympus 40-150 f2.8 Pro lens. Oh for an aftermarket lens hood based on the Voitlander design. Now there is an opportunity for a manufacturer, aftermarket bespoke lens hoods with matching lens caps. I suppose my creative mind is day dreaming yet again.
Cockatoo - The Greater Blue Mountains World Heritage Area, Olympus 75mm f 1.8 lens © Leonard Metcalf 2015
This lens focuses very quickly on my modern Micro Four Thirds bodies. With eye detect on, it is a breeze to use.
This lens peaks in sharpness at f 4.0 and is quite stunning by f 2.8. I do love the bokeh this lens produces wide open. It is my go to lens for portraiture and figure work. I am tempted to buy a second body of my main camera, so I can use this lens and my Voitlander 25 mm without the need to change lenses. My current second camera is a different model, and quiet frankly it quickly gives me this shits changing between the two cameras.
Olympus 45 mm f 1.8
Mist burning off at Cradle Mountain Olympus 45 mm f 1.8 © Leonard Metcalf 2015 - The spiders webs in this shot print out beautifully crisp.
This lens was my previous second lover. With it I have taken more photographs than the 75 mm by virtue of the length of time that I have owned it. It is light weight, and cheap, with just stunning results. If you're on a budget this is next lens on your list.
Just like the other Olympus lenses it is a stunning performer. Perhaps let down in build quality with a plastic feel to it. The feel is much better than the Olympus plastic kit lenses though. Nethertheless is performs, and the weight saving is appreciated particularly on my long walks into the bush.
This lens gives you some beautiful reach, and it really comes into its own as a portrait lens. With the auto focus I have taken some stunning portraits with this lens and the near eye focus detect. It makes portraiture a breeze at a very affordable price, with the most stunning results.
This lens peaks for sharpness at f 2.8 and wide open has a lovely bokeh.
The lens hood that you can get for this lens works, despite being an over priced piece of plastic. Why it isn't included with the lens is a mystery to me, at least Olympus has started to listen to the complaints and is starting to include lens hoods with its newer release lenses such as the 25mm f 1.8.
I have created stunning 20 inch prints from images captured with this lens, amazingly sharp and capable despite its demure appearance.
Panasonic G 20 mm f 1.7 ASPH
This is an amazing lens for its price and size. It makes my micro four thirds cameras seem pocketable. It is a beautiful performer, and is sharp for a wider range of apertures than the other lenses in my recommended list. It peaks at f 4.0 and is sharp from f 2.0 through to f 5.6.
I don't use this lens very often, and it is on the list of lenses that I need to get to know better. Many find this lens the perfect focal length for their walk around lens. It suits street photography very well. Though I currently find it a little wide for my taste.
This lens comes in two versions, and I have the first version, and it hasn't seen much use yet.
Panasonic G 14 mm f 2.5 ASPH
Eurobdalla Coast, Panasonic 14mm f 2.5 lens © Leonard Metcalf 2015
Another stunning yet amazingly cheap lens. This lens is often bundled in kits with some Panasonic cameras, which means you can pick up an un-boxed new version rather easily and well below the list prices. It is tiny, and is the smallest lens I own. When I am after a light weight wide angle this is the one that I pack. I even picked up a lovely aluminum lens hood for it, that has a Leica feel to it.
This lens is sharp from wide open at f 2.5 through to 5.6. Again this lens comes in two versions, and I have the first version.
Samyung 7.5 mm f 3.5 UMC FishEye
I personally find the fisheye lens more of a toy and a game to play with rather than a serious contender in my camera bag. This assumption is seriously flawed as this is another stunning cheap lens that just performs amazingly well. I put it on, and focus by using hyper-focal focusing. Set my aperture to f 4.0 or 5.6 and just shoot away on aperture priority. The results are amazing. The included image here, prints up beautifully, and at my last open day at the studio was the first image to sell.
Paulownia plantation, Samyang 7.5 mm f 3.5 lens © Leonard Metcalf 2015
This lens has a manual aperture ring, and manual focus. It is a pain in the neck to focus through the viewfinder as the depth of field is huge. This is the sort of lens you need if you want that butterfly up close and in focus and the mountain forest in the background to be sharp enough to read.
Wide open this lens performs well, and by f 5.6 the sharpness is falling off. I won't use it at f 8.0
You may need to do your homework on hyperfocal focusing to get the most of this lens. I use this lens set at f 5.6 and put the infinity focus mark on the f 4.0 mark for my hyperfocal distance.
This lens distorts, and does it in a huge way. You can't easily put a filter on this lens as the front element protrudes out the front. It has a built in lens shade and a lens cap that goes right over the lens shade.
This lens is also available branded as Rokinon and Bower.
Great fun, and for the price you can't go wrong.
Olympus 60 mm f 2.8 ED Macro
The last lens in my kit is the Olympus 60 mm f 2.8 ED Macro. This is a true macro lens that allows you to take images 1:1 or at life size (the same actual size as the sensor). This lens is also water sealed, which makes it ideal for use in wet weather. The lens comes with a focus limiting switch which reduces the distances it focuses on. This is a fantastic option to have with macro, as it stops much of the annoying hunting when the camera searches for focus by going to the extremes of focus. This can take time, so by limiting it, you get faster focus. You can also switch the lens to 1:1, which is very handy as you can go straight to the closest focus.
Unidentified native flower - Olympus 60 mm f 2.8 ED Macro lens © Leonard Metcalf 2015
This lens is sharp, very sharp. It rivals the Olympus 75 mm 1.8 and the Voitlander 25 mm f 0.95 in tests. So for its price it is the cheapest sharp lens available for micro four thirds.
It is small and light weight, and still comes in at a very good price. It is made of plastic, and does have that feel to it.
This lens can be used for portraiture as well, though you won't get the creamy bokeh you get with the 75 mm.
For the price, and its quality, this lens is definitely on my must have list, for the images it is capable of producing is well worth the small outlay.
Wish List
The following list is the lenses that are on my shopping list. Perhaps it is better to say they are on my wish list. I am not sure if I really need them. I would like the 12 - 40 mm f 2.8 as it is weather sealed, and as I shoot so often in the rain it would bring peace of mind to my photographic practice. The wide angle zoom may be fun, while the longer zooms will give me greater reach with wildlife.
Olympus 12 mm f 2.0 ED
Olympus 12 - 40 mm f 2.8 ED PRO
Olympus 40 - 150 mm f 2.8 ED PRO
Olympus 7 - 14 mm f 2.8 ED PRO (yet to be released)
Olympus 300 mm f 4.0 ED Pro (yet to be released)
While I am on my wish list Olympus, how about a Pro series weatherproof fast aperture metal construction 25mm. One that allows me to get reasonably close, like my a Voitlander does. A lens like this would soon become my number one favourite and would see more use than any other lens. Photographing in the rain and mist is where my best photographs are created. I really don't understand why the 75mm lens isn't weather sealed, while I can easily Judith it with the cheaper primes they make.
Recommended
I would recommend these lenses based on reviews and images I have seen taken with them, but I don't need them as I already have other lenses that perform adequately in their focal length. I tend to prefer Olympus lenses as they don't have image stabilization built into them, for the stabilization is built into my camera.
Panasonic Vario 12 - 35 mm f2.8 ASPH P.I.O.S.
Panasonic Vario 7 - 14 mm f 4.0 ASPH
Leica DG Summilux 25 mm f/1.4 ASPH.
Leica DG Nocticron 42.5 mm f 1.2 ASPH P.I.O.S.
Voitlander Nokton 42.5 mm f 0.95
Don't bother
These are the lenses I have used and I don't like. I see a noticeable lack of clarity when using them as they are no where near as sharp as the recommended lenses. I can clearly see the difference with these lenses on my small 10 inch prints (30 cm), let alone when doing larger enlargements. I have some of these, and will happily give them to anyone who would use them.
Olympus 12 - 50 mm
Olympus 14 - 42 mm
Olympus 75 - 300 mm

learn to drive a camera in manual
A quick overview extolling the benefits of manual control of your camera and exposures.

Ghost gum, Ormiston Gorge, MacDonell Ranges, Central Australia © Len Metcalf 2015
I was lucky when it came to learning to use a camera. Firstly I was so young I don't really even remember learning. Secondly I learnt to drive a manual camera. An Olympus OM-1. No autofocus or auto metering. Actually at the time it was a ground breaking camera, for it had it's small size on its side. It did have one thing and that was an internal light meter. The middle area of the frame was the area that the camera took the light reading from. The same as center weighted metering on your camera today. I can remember longing for the titanium spot metering model, the Olympus OM-4Ti spot. What ever I pointed the center at would turn mid tone in the final image. Learning how this worked was a start in my learning journey. Later in life I moved to fully manual cameras. Ones with no light meters, no electronics, focusing is done on a ground glass, or by distance scales. To figure out the exposures I used external light meters. Initially it was a Western Zone meter IV. It ran from a photovoltaic cell. No batteries. I could put a white dome on it to take incident readings. Latter came electronic light meters, a Pentax spot (I used an analogue model and a digital zone modified one) and a tiny pocket incident meter.
Learning to calculate the exposure with these tools was a valuable lesson that pays off in difficult exposure situations. While I don't advocate going to the extreme of using an external light meter (though there would be a great deal of benefit from doing so). I do suggest you learn to use your camera in manual mode. It will be a useful exercise in getting the most out of your camera. I recommend you put your camera in manual and keep it there until you can use it without thinking. That means keeping it there for the next month or five, not just the next shoot.
With black and white negative film the exposure determines where the blacks and dark tones fall, while the development time determines the highlights. Most will just worry about where they want shadow detail to appear in their photographs and use that to calculate their exposure.
Digital has its own similar quirks. The details are in the highlights with digital cameras. There is more information in the highlights. The point where the highlights change to white is a very important point. Either you have information in your highlights or they are overexposed and nothing can be done to recover them. This has lead to the popularization of Expose To The Right (ETTR). By using this technique you can end up with a cleaner photograph, particularly in the shadows.
To use ETTR set your exposure so the the histogram starts perfectly on the right hand side, exactly from the corner. The resulting photograph should not have any clipped highlights and will probably appear too light when reviewing it. Latter you can alter the exposure in post processing to give it the look you are after. ETTR is an advanced skill and is better tackled later in your learning journey if you are a beginner.
Now you have your goal in terms of what a good exposure looks like. You can now adjust your three variables to help you get there. The three variables are ISO, shutter speed and aperture.
Now that you can can control your camera without thinking, you can use your histogram to judge exposure. I use the histogram to judge exposure all the time. I leave it on in my viewfinder all the time, so I can see what the effects of my exposure adjustments are doing in live time. You can only do this with cameras that have electronic viewfinders. Otherwise you will need to chimp your histograms on the screen on the back. Some cameras allow you to set exactly at what tone the end of the histogram starts at. I drop mine by three units to give myself a little leeway.
Some of us think that this would be a good addition to modern cameras, a setting for exposure that sets exposure exactly for ETTR, as this would be a very easy bit of programming and would give many of us some huge benefits.

using a framing device
Framing devices are used by professionals to help them.
A framing device is a very useful tool in improving your photography. It has been used by artists long before photography came onto the scene. It is helpful for pre-visualizing the final photograph.
For those who use a standard format sensor in the 2 x 3 ratio the best and simplest framing device is an old slide. The plastic ones with white on one side and black on the other make the most fantastic light weight framing devices. We should put them on a neck chain and wear them. As now that they are retro, they would look fantastic...
To use one is simple. Choose the white or black side for your scene. If your shooting in a dark environment choose the white side. If your out in bright conditions the black side is going to be more effective.
Now hold it up to your eye and look around at the world and start taking photographs in your minds eye. Hold it parallel to your eye ball (perpendicular to your line of sight). Hold it 5 centimetres from your eye. If you do this, you now have the equivalent of a 50 mm full frame lens on your camera. Move it out to 10 cm and now you have a 100mm full frame equivalent on your camera. Move it in to 2.4 cm and you have your wide angle 24mm full frame equivalent.
Too easy..
Now practice and practice and practice framing up your photographs in your mind. Notice how that when you move the photograph is going to change. Move closer to your subject, move up or down and reposition objects so that they make a balanced composition. How do you know it is balanced, well you decide by your feelings. Let your intuition guide you.
Don't have a 35mm slide. Well you can make these out of cardboard.

additive or subtractive photography
Are you an additive or subtractive photographer? Something worth thinking about in your compositions.
Stone circles, South Coast of NSW © Leonard Metcalf 2014
I wonder if there are two schools of thought. One where photographers wander around with their cameras wondering what to add to their photographs, and the others who are thinking about what can be removed to make their photographs stronger.
Perhaps the the first approach is the one of the novice, while the latter is the thought processes of a master.
Which one are you?
Ralph Gibson is the latter. Here he describes his process of subtraction.
"....if you’re going to make a drawing, you take a paper and a pencil and add lines, add marks, until you finish your drawing. It's additive. When I make a photograph, I move in closer and I take things away, and I take things away, until I get everything out of the frame except what I want. Therefore my process is considered subtractive."
He goes on to explain how he does it...
"Now part of this subtraction has to do with casting things into deep shadow. I eliminate a lot of unwanted material, activity into the shadow area. And in so doing, create a shape. Instead of just being a variation on light, for me shadows become cut forms, they become shapes. And I discovered this by photographing primarily in bright sun and exposing for highlights, which is pretty easy to do. Most people struggle to get detail into their shadows. I was never interested in that kind of photographic expression particularly. - Ralph Gibson
source for quotes: http://bermangraphics.com/press/ralphgibson.htm

what makes a great photograph?
time makes a great photograph
Model: Angel Rose © Leonard Metcalf 2014
“The key is that the longer I want to keep looking at a photograph, the better the photograph is. If lots and lots of other people want to look at the photograph and keep looking at it for a long time, then that is proof that it is a great photograph. So to me the thing that makes a great photograph is time.”
where to photograph in the blue mts
The Three Sisters - Photograph copyright © Len Metcalf 2020
Locations worth visiting for photographers…
This article is in draft form… and will be continually updated.. and rearranged. I am aiming to have a few sections including; close to Blackheath / Wentworth Falls / Katoomba & Leura / Lawson / Lower Mts / further afield. Each of these will have its own post.. I expect this to be a long and slow task..
Car parks and lookouts
The Three Sisters peeking out of the mist from Eagle Hawk Lookout, Cliff Drive Katoomba © Len Metcalf 2015
Eagles nest lookout: the best quiet view of the three sisters. Amazing at sunset with the orange sandstone sisters getting a stunning soaking in golden sunlight. On a clear night the sisters are flood lighted into the early evening. On days where the mist is swirling and rising occasionally they break through the mist and magical images can be taken from this lookout.
Mount York, Mount Victoria: golden sunset rays bathe gums and iron bark trees at this vista at the end of the day. A lovely short walk around the famous climbing cliffs and one of the original routes off the mountain and into the valley.
Pulpit rock at Mount Victoria is a delightful stroll from the car park. Views over to the cliffs at Mt Piddington are good in the afternoon when there are lovely clouds. Also worth visiting when the mist is thick. Avoid on high wind days. Unfenced location so be very wary of cliff edges. For the more adventurous walking down little zig zag to the bushrangers cave which was the subject of early etchings and photographs.
Fish River, between Lithgow, Oberon & Bathurst is a granite boulder filled creek full of trout, amazing reflections and gentle pools that are lined with smooth round rocks. Easy to get to, and well worth spending the whole day there. Pack a lunch as there isn’t any shops out there. Easy but long drive from upper mountains.
Evans lookout, is a very short stroll from the car park and is best visited at sunrise or sunset. On misty days try the paved walk along the cliff tops for some amazing gum trees.
Short easy and gentle walks
Scenic railway boardwalk. Catch the train down early in the day. I mean as soon as they open, and wander the board walk. You will be probably enveloped in gentle soft diffused light from the thick mist from Waragamba Dam that dominates the local climate. Lyre birds feature prominently and can be photographed from the board walk beneath you. Catch the scenicsender back to the top.
Charles Darwin walk – start at the great western highway and
Jamison Creek, Charles Darwin Walk, Wentworth Falls
walk as far as you feel comfortable, remembering that it will take just as long to get back to your start.
Lyrebird Dell at Mount Victoria just makes it into the gentle section, though it does involve a steep hill down and back up. Park at Browns Oval for the easiest walk into this location, and be enchanted by the sections of rainforest littered with amazing fungus particularly after a wet spell.
Coachwood Glen, is one of my favorite locations. I seem to keep finding new shots each time I visit. There is an amazing stand of King Ferns, a tumbling creek with some delicate little drops and some beautiful Coachwoods within the rain forest to capture your imagination. In the wet the track may be a little slippery and
Coachwood Glen, Megalong Valley
muddy so wear sturdy shoes. This is best visited on overcast days or late afternoons or early mornings before full sun mottles the scene with burning highlights.
Waterfall circuit at Lawson is worth the effort. My favorite has to be Junction Falls. I first visited these on my queen scout walk at 15 years of age. I drew them and photographed them to prove to the assessor we had visited them. Serendipitously my scout master planned out my major walk around Blue Mountains waterfalls. The final submission included beautiful coloured pencil drawings of each waterfall we visited over the weekend.
Pulpit Rock, Blackheath is a short walk with some steep stairs to get right onto the most stunning lookout. You will get 270 degree view. I like to be here on a clear day around sunset. The cliffs opposite at Lochley’s Pylon, Mount Banks, Mount Hay and Fortress Ridge are stunning when flooded with golden sunlight. Stay after sunset (with a torch) to get some beautiful after glows in the early twilight.
Butterbox point, at the end of Mount Hay Road, Leura. This is a long drive on a dirt road. If it is very wet or you have a low slung vehicle I would avoid it. There are some great spots to stop off on the way such as Flat Top and the Three Pinnicles. At the very end of the road follow the old road for 50 metres, then veer left on a foot pad. Walk to the end, making note of where you have come from so you can return the same way back to the car. This is a remote location on top some very high cliffs. So make sure you stay well away from the edge. We tell out clients to stay two body lengths away from the cliff edge. I have lost some very dear friends to large and small cliffs, it pays to be very cautious. This is a good location for sunset. I haven’t made it there for sunrise, but imagine it could be spectacular. Avoid middle of the day in direct sunshine. The vista from this location is stunning, as you look out over the Grose Valley.
Multi hour walks
Leura forest, is accessed from either the giant stairway at the Three Sisters or Dardanelles Pass . Yes this is a step walk down and back up again, but well worth it. On a sunny day this location works well late afternoon when the forest is bathed in shadow from the huge cliffs above. It would be well worth visiting on a wet or misty day. Avoid being here in full sunlight at the middle of the day.
Ruined castle from the golden stairs.
Weeping rock and Wentworth falls. Best shot in the early morning or late afternoon. Look for the golden reflections in the water at sunset as the golden glow is intensified as it bounces off the orange walls on Jamison Creek. A favorite spot rich in colour and water that is very compact.
Ikara Head via Asgard Swamp takes you to an amazing view down the Gross Valley. From here you get distant views of Mount Banks and Mount Hay. There is no track to the best views and you're on top of 70 metre cliffs so this location is only for those with suitable experience. The Asgard Swamp fire trail can be found off Victoria Falls Road. Other heads in the area include Valhalla &Thor heads. This is is a good place to visit in the afternoon. I would like to stay there for sunset one evening, but the long walk out in the dark has so far stopped me.
Valley of the Waters, starting and finishing at the Conservation Hut is a firm favourite. I love to be down here early. I walk straight down to Empress Falls before getting my camera out. You can shoot here all morning until about ten am when the sun starts streaming into the canyon. Afternoons also work well once the full sun is out of the valley. Stunning after rain, and in the mist. The water falls at the Valley of the Waters is the most stunning set of cascades in the Blue Mountains IMHO.
Half day and longer & strenuous walks
Empress falls and the valley of the waters. If you can handle the walk in down the stairs then this is a not to be missed location. Take a tripod for those soft waterfall shots and use 3 second and over exposures for best results. On a bright sunny day you would be wise to take a neutral density filter. But for best results be down there first thing in the morning aiming to be finished
Coachwood stand at Empress Falls, the valley of the waters, Wentworth Falls
shooting by nine or ten am. Take a jumper as it will be noticeably cooler down there than at the conservation hut where you park your car. Also take some snacks and some water for the long limb back up all of those steep stairs.
Blue Gum Forest is a long hard walk only due to the long drop into the valley. The quickest way down and up is via Perry’s Lookdown, though I do prefer to walk in via Lochley’s Pylon from Mount Hay road. This is best done as an overnight or even three day trip. Another classic route is starting at Mount Victoria and walking down the Gross Valley to Blue Gum. Camping has been removed from Blue Gum and allowed the undergrowth to regenerate a fantastic bonus for photographers. This stand of trees is very important as it reminds us of an early conservation battle that was won when the bush walkers of the time put their hands into their pockets and raised the funds to buy this stand of trees and donate it to the government. Lead by Myles Dumphy and supported by Paddy Pallin and my father. Dumphy proposed and fought for the Blue Mountains National Park,
If you would like to be taken on a photography tour of these locations Len’s School has a number of different options available to you. These include luxury small group gentle tours through to a landscape photography workshop and a shorter guided day trips.

what is fine art photography?
Len examines what makes photograph fine art photography...
Mea Culpa in a grass field in Sydney © Leonard Metcalf 2011
Collectability
Fine art photography has been defined by how collectable the photographs are or become. Are the images enduring enough to stand the test of time. For some the ultimate goal is to have their images preserved in museums and art collections, or in the possession of collectors. What makes an image collectable varies widely from the image or content, process, photographer and historical significance. Many collectable photographs are indeed not fine art. In discussions with a gallery owner, one of the key ingredients of a collectable photograph was its rarity (ie limited print run, by edition or death).
Archival stability
Tightly aligned with collecting is the expectation that fine art photography can survive time, long term storage and display. Though this alone does not guarantee that the image is indeed fine art. Many photographs that have been actively collected (bought and sold for high prices) may not indeed be archival, but it does seem to be of primary importance to modern photographic collectors.
Art for arts sake
Because I enjoy taking photographs against my own criteria for what a great photograph is. It is the reason I study other photographers’ (and artists’) work with such passion. To observe, to copy (for the purpose of learning) and then to produce something that is indeed different. Finding ones own personal vision in a world of appropriation has become a life long passion.
Communicates
My passions for the Gaia (mother earth) and deep felt desire to stop humanities abuse of her lie beneath my wilderness (landscape) photographs. If Dombroskis’s photograph of Island Bend can educate and influence a voting public into saving the Franklin River (Tasmania), then there is hope in nature photography to be able to influence the world to move towards an environmentally sustainable future. Art by its very nature is about the communication of ideas, principles, thoughts, feelings and passions. When you look at one of my photographs you are indeed looking through Len’s lens, my interpretation of the world and what I see.
Aesthetics
My goal is to produce an aesthetically pleasing photograph without copying those who have gone before. When you look at a photograph and you get that wonderful feeling inside, because of its inherent beauty, then it must be fine art. Not to say that all fine art makes you feel good.
Made by an artist
What makes an artist? Creativity as expressed in an artwork… is perhaps one of the only clearly defining links between artists.
Sold as art
Recently I have started to wonder if the ongoing sales and popularity of particular images, some just seem to keep on selling, are really fine art images. Some of my most outstanding fine art photographs (measured against my own criteria) have never sold. Sales is a worthless criteria if you are to judge fine art by what history has demonstrated with very few artists gaining success in their own lifetimes, though since modernism this no longer appears to be the case.
Fine art
“Essentially the distinction between ‘art’, ‘craft’ and ‘APPLIED ART’. The modern notion of ‘fine art’ can be traced back to the Renaissance when ther was a strong movement, led by Leonardo da Vinci, to demonstrate that the painter in particular was practicing an intellectual and not a manual skill. Included under this heading are drawing; music; painting; poetry; printmaking; sculpture; (photography ed) and other forms of art which do not fulfil a practical function.”
- Reynolds, K & Seddon, R 1981 ‘Illustrated dictionary of art terms; a handbook for the art lover’; Edbury Press, London
Fine art photography
“…the term is taken to be a picture that is produced for sale or display rather than one that is produced in response to a commercial commission. It is assumed that most of the pictures that are covered by the fine art banner are personal images that meet self-imposed criteria, and that they are, as a result, very close to the heart of the photographer and are representative of his or her interpretation of the world.”
- Hope, T. 2003 Fine Art Photography, creating beautiful images for sale and display; RotoVision SA, Switzerland

Len's camera equipment
Len lists his camera bag contents
Cradle Mountain Hut, Tasmania © Leonard Metcalf 2014
This is rather dated now…. if you are interested in what I am using now? November 2020
Olympus OMD EM1 mk2
Voitlander 25mm f0.95
sometimes I also use:
Voitlander 60mm f0.95
Olympus 75mm f1.8
Olympus 300mm f4
For ultralight kit for extended bushwalks:
Olympus EM5 mk 3
Panasonic 25mm f1.4
For Abstract Photography I have a full spectrum modified camera
Olympus OMD EM1 mk2
I occasionally use a full frame, but would love to sell it.
Panasonic S1r
Panasonic 50mm f1.4
I have sold and also tried
Fuji GFX 50s
Fuji 63mm f2.8
I am currently taking a hiatus on film and have a fridge with 4 x 5 & 8 x 10 film waiting for inspiration and time to be right to use.
Len dives into this equipment list and leaves some of it at home.
Camera bag
Pea less emergency whistle (Len will supply)
Ultra light head torch (Black Diamond)
Camera
Lenses
Spare memory
Neutral density filters
Polarising filter
Spare batteries
Lens cleaners (tissues, cleaning fluid & micro fiber cloth)
Cable release or remote control for camera
Lens shades
Reading glasses
Camera manual
Camera bag to put it all in
Light weight umbrella
Digital camera specifics
Olympus OMD EM-1
Olympus OMD EM-5 (spare camera)
7.5mm f3.5 Samyung lens (15mm equivalent)
14mm f2.5 Panasonic lens (28mm equivalent)
25 mm f0.95 Voitlander lens (50mm equivalent
45mm f1.8 Olympus lens (90mm equivalent)
60mm f2.8 Olympus macro lens (120mm equivalent)
75mm f1.8 Olympus telephoto lens (150mm equivalent)
75mm - 300mm f4.8 - 6.7 Olympus telephotos zoom lens (150mm - 600mm equivalent)
2 Olympus spare batteries for OMD
32 & 16 gb Scan disk Extreme Pro memory cards
Olympus battery charger for OMD
BW circular polariser
BW 10 stop neutral density filter
BW 3 stop neutral density filter
Kodak lens tissues
Lens cleaning fluid
Micro fiber lens cloths
2 x Lacie rugged external hard drives
Macbook pro 13" retina display notebook
Macbook pro power cable
Ipad mini
Ipad power cable
Film camera specifics
Razzle 900 DF 4 x5 camera
Fujinon W 5f.6 150mm lens
Linhof technica III
Fujinon A 180mm f 5.6 lens
Toyo G 8 x 10 monorail camera
Nikkor 300mm f 8 lens
Changing bag - Harrison pulp tent
4 x5 dark slides (lots)
Spare film boxes
Pentax digital spot meter
Goosen Digisix incident light meter
Film 4 x 5 sheets: HP5, Delta 100, Porta 400, Velvia 100
Film notes / reciprocity information
Bellow extension calculator
Spare batteries for both light meters
Tripod and camera supports
Really right stuff camera plates & L plates for all cameras
Gitzo carbon fiber tripod series 3
Linhof ball head Provi II
Gitzo carbon fiber tripod series 1
Linhof ball head I
a Manfrotto heavy one
Really right stuff pano head and nodal slide
Camera repair kit
Filter wrenches
Tweezers
Magnifying glass
Tape
Sensor cleaning kit
Screw drivers
Pliers
File / metal saw
Lens cleaning supplies
Giottos pocket rocket

Faces in the Canyon
The story behind my first iconic image....
Faces in the Canyon, The Greater Blue Mountains World Heritage Area © Leonard Metcalf 2000
A late start... A very very late start! Facilitated by the late night commitment to go and take some photographs in a canyon the night before. I can easily blame Jamie. "Len, I think you need a couple of black and white photographs in your gallery." So I had one packet of Kodak T400CN in 4 x 5, and loaded up ten shots into the five dark slides. And proceeded to add some black and white images to my colour collection of The Greater Blue Mountains Wilderness, and to my collection of canyon photographs I had been working so diligently on.
But I can't blame Jamie for being up with me late, playing pool and drinking. That was equally my fault. And was the usual past time at our house at Mount Piddington. So this Friday night was no different to many others.
I wish I could say we were up at the crack of dawn, but we weren't. I don't think we managed to get out of the house before 2 pm. I packed the Linhof Technica III with a Nikkor W 150mm f5.6 lens into a small pelican case, the tripod went into a extra long dry bag. All of which was thrown into my pack with my wetsuit, and other little luxuries like a thermos, a hand towel and my antacid. Desperately needed to help me recover from the excessive drinking.
We walked down the exit track into the canyon, passing many as they walked up the hill in the late afternoon. There was a crowd at the beach, while we blew up our lilos (air beds). Strange looks as we departed upstream. "Where are they going at this time?"
A few kilometres up stream. Some wading, some walking some paddling bought us to the tributary canyon. The walls are so tight that you can't walk through with your pack on. Particularly with a pack with a Pelican case in it. When we reached 'the green room', Jamie left me for a while, and he headed up stream further to explore. While I toweled my hands dry and started to get my camera out and set up on the tripod.
This was the first photograph I took that late afternoon. It was the single exposure onto black and white film. I scrambled around to try and get a few more shots, and manged to compose two more, which I took on transparency film. My companion was soon back, reminding me that it was time to leave this beautiful spot. So we headed off. The canyon was quiet now. Being so late in the afternoon, all the smart canyoners had left. We had the place to ourselves.
Drifting downstream on your lilo, on your back, leaning against your pack, gently paddling downstream is magical. You look up and all you can see is stunning photograph after stunning photograph. Each to snapped in my internal photo album that exists only in my head, only for me to see and look through.
Back at the sand beach where we had walked in, we could change, back into some clothes, and drier shoes. We donned our wet packs, still dripping with the cold canyon water and headed back up the hill.
It was very late by now, and we had miss-judged our daylight. As we topped the steep cliffy rise, past the small climbs we lost daylight. Neither of us had bought a torch. We walked slowly, just able to see the break in the ferns that marks the footpad. Between the king ferns a light started glowing. A full moon was just rising, and the darkness soon lifted. We were able to easily walk back to the 4WD and head home to relax with another beer, a hot shower and yet another game of pool.
This photograph didn't come up too well in the proof that I had ordered when it was developed. But there was enough there to show me that it had potential. A drum scan soon changed that, and this image jumped to life. I used it as the marketing image when I opened the "Leonard Metcalf Gallery" in Katoomba. I had it on posters and a post card. People would show up to the gallery with the post card in their hand (they needed the map that was on the back to find me). I would ask them why they came, and they always replied and pointed to this image.
On that original postcard I had named the location of this shot. The local outdoor guiding companies had a 600% increase in requests to go this particular canyon. So now I don't tell the location, and prefer just to tell you it is in The Greater Blue Mountains World Heritage Area, in a canyon somewhere.
Details
Catalog number: 0001
Camera: Linhof Technica III circa 1950 4 x 5 inch
Lens: Nikkor W 150mm f 5.6
Film: Kodak T400CN

camera love
Does your choice of camera matter? For me loving my camera is so so important. It comes with time, so you love the moment you see them, others take time to fall in love with. For some advice on how to fall in love with your camera read on.
My beloved Ebony 45 SU which now has a new home and is hopefully serving its new owner well. I could set this camera up blind folded and had a very specific system when using it. © Leonard Metcalf 2012
People regularly say that your camera doesn't matter, but unfortunately it really does. Yes a good photographer can probably make use of any camera to make satisfactory images. It does take special tools to make outstanding photographs. Photographers at all levels should and do spend copious amounts of time choosing cameras on their performance, handling, features and lens sets. I am no exception. My favorite blog is a camera rumors site. Yes, I do admit to being a gear junkie.
Besides, it is important. No, it is crucial to love your camera. You must know your camera intimately, its foibles, its limitations, how it handles and how to coax every last drop of creative juice from it. Choosing a camera is no lesser of importance than choosing your life partner, though luckily you can trade your camera in, and keep updating it. Some even recommend that a new piece of equipment can help break that creative deadlock that many of us find ourselves in every now and then.
Spending time on the couch, playing with your camera (an exercise promoted and described by Bruce Barnum called 'Camera Cuddle'), learning and practising using it until it becomes second nature. An extension of you. Just today I was reminded of this as I had my camera suspended upside down, just an inch from the ground taking close ups of a stunning red fungus that Emily Reader found. Suddenly I was changing my settings, basically from memory and feel. I was glad that I had spent considerable time memorising every control on my camera. All of those hours practising on the couch while watching tv certainly paid off.
Lens love is worth considering as well. How intimate are you with your lenses. I don't mean taking them to bed and doing a camera cuddle, but time with that lens in an exclusive relationship. I put a new lens on my camera and it has to stay there until I become intimate with it. I have to know it inside out, be able to pre-visualise all aspects of it.. And then when I do, the images flow so much more easily. It is easier to get to know a prime lens, which might go some way towards accounting for their popularity.

how to find the ultimate camera bag?
Len discusses his frustrations about finding the ultimate camera bag.
Is there such a beast? The ultimate camera bag, does it even exist? They are a bit like tripods, over your photographic lifetime they may multiply in the cupboard. Each purchase adds to the pile. The trouble is that you get seduced with the promise of more space, and as soon as you get that space, you start to fill it up with more camera gear. It keeps growing, and so does the requirements for the camera bag.
I have gone through a fair few in my time, so without recommending the perfect one I do recommend considering a few things.
What do you want to carry in it. Lay your items out, and consider your contents over a period of time. Do you actually use everything you're planning on putting in there. Can you get away with less.
Do you go out on walks with your camera bag? Because if you go bush with one, I recommend you take with you a few things, including: raincoat, jumper, small first aid kit (here in Australia that means at least an elastic roller bandage and your favorite medications), snacks and sufficient water. I like to take a thermos of tea too, and a map, compass and EPIRB or PLB
Comfortable, it has to be comfortable. The best way to test comfort is in the shop, and put 20 kgs in the bag and put it on, and stand there or walk around the shop for an hour. If it is still comfortable then go for it. This is the same strategy we use for choosing bushwalking shoes. Nothing beats the test of time.
Size, the only way to really test the size is to take everything you plan to put in your new camera bag to the shop and put it in there and make sure it fits.. Rearrange the dividers and check to see your camera fits in with all the lenses, batteries, filters and accessories you want to take with you. Look to make sure it is deep enough. That the dividers can be rearranged to fit you gear. Some now have lower dividers for smaller cameras, giving you extra space for your laptop (great idea Think Tank).
Consider weather proofing, and if your bag is going to get soaked regularly you may want to go with a more water resistant or a water proof bag.
Regardless of how well you do all of this, you will still end up with more than one. Each one will suit different trips and equipment. What you take on an animal trip to Africa is different to what you walk along the streets of Sydney with. Different equipment, different requirements, different needs.
Ok, so I am currently considering an f-stop Loka, as I need to be able to carry a first aid kit and a whole lot more safety equipment (and special treats) while running photographic tours. :)

Which camera bag will take all of this?

light painting the figure
Painting in figures with a torch during long exposures is one of Len's favorite techniques. Here he describes how he does it. Go on try it tonight.
Our last photograph before finishing. The light had almost gone, so I added some more with a torch, as described bellow, painting around her so that it was soft and not directional. From our book ‘ Our love affair with trees.’ that I am co authoring with Jodi Rose.
Lightpainting the nude figure is fun and gives us the most beautiful results. The light can be shaped in ways that no other technique can replicate. With minimal equipment and a little practice stunning results can quickly be achieved. Equipment considerations
Camera that you can set on 60 second exposures or on bulb
Sturdy tripod
Torch - the choice of torch is important. Recently I have settled on LED torches and have fallen in love with a LED Lenser (P6)
Willing model & suitable model release
Before running out the door with all of these things I do recommend having a quick look at the weather and the outdoor temperature. Here in Sydney it is really only warm enough to do this in the summer months (Nov - March).
The other thing to consider is the location. Obviously somewhere quiet without onlookers is a serious consideration. The other thing to look for is solid objects to lean the model against. Have a look in the following photograph. Her head is propped against the tree as is most of her body. This keeps her still for the minute exposure. I do a verbal count down so that the model knows when to start being still and so they can hold their breath for the whole exposure. I also tell them when it is over so they can relax & breath again.
Before we get to taking the image the first thing you need to consider is the exposure. I like to use a sixty second exposure as this gives me plenty of time to work with the torch. I always set my ISO as low as possible, my current camera only goes to 200 ISO so that is what I use. The next step is to play with the aperture to get enough of an exposure in your background. I have been finding f 5.6 seems to work for me and I use that as a starting point. I put my camera in manual and then take an exposure (60 seconds @ f5.6) and then have a look.
If your camera at this point seems to be taking a long time before you can view the image this is because you have long exposure noise reduction on and your camera is taking a second exposure of the blackness (with its shutter closed) and subtracting the hot (white) pixels from the original photograph. This is called a dark frame subtraction. Despite this being inconvenient it is a good thing as it reduces noise in your final photograph so I recommend leaving it on. Most cameras have this default set to start on exposures after 1 second.
While determining the exposure I need to consider the final look. I like my night photographs to look like they were taken at night, so I tend to under expose them so there is a lot of black so they look quiet dark. This is my personal preference. If you want a darker image stop down your lens to f 8 or f 16. If you want a brighter photograph open up your lens to f4 or f2.8. If f5.6 is your widest aperture then you can always increase your ISO. Try doubling it.
The wind blows gently and moves the fabric to soften this part of the photograph.
Now we are ready for our model. To keep your model warm keep them clothed and start working on your composition, the models pose and light painting. I figure out what it will look like before you do a nude version. Sometimes these test photographs are so good that you may not go any further. The following photograph is an example of one of these tests.
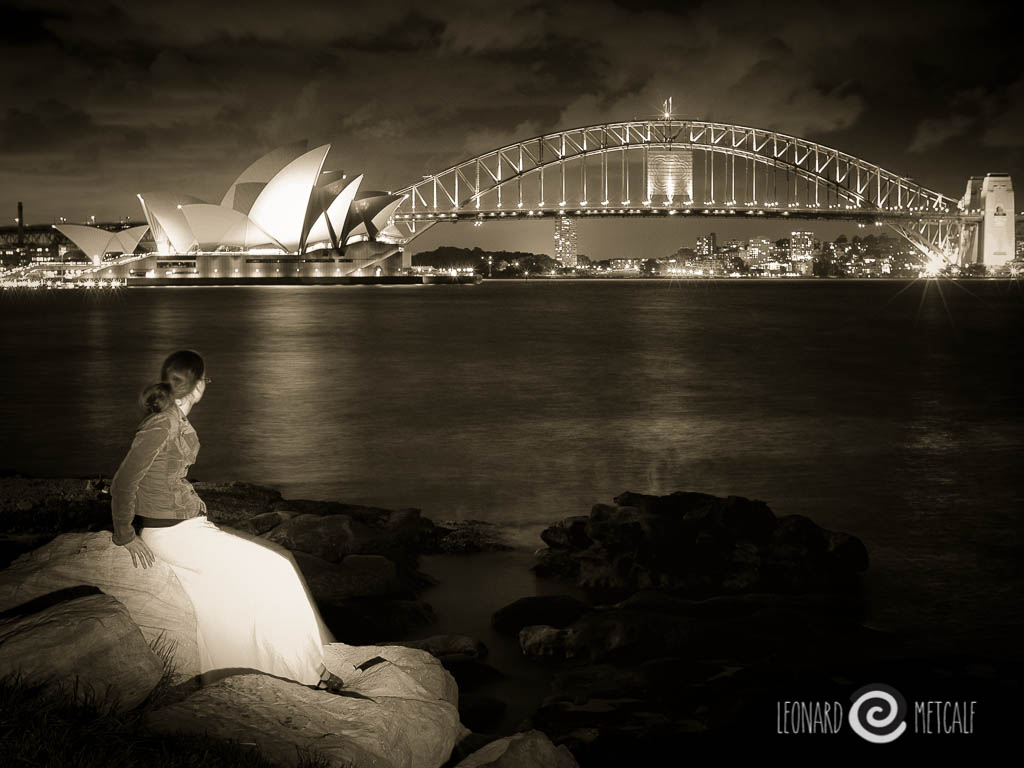
Mea Culpa & Sydney, I love this image even though It was a test / practice shot and it has now made its way into my catalogue © Leonard Metcalf 2011
Now you need to figure out your torch exposure. This is simpler than you would imagine. I start with a 30 second exposure. I walk around behind the camera painting my subject with light from about ten metres. I work evenly on both sides of my camera (left and right) and vertically as well. By doing this I get a very soft light that wraps around the figure.
The last 30 seconds of my exposure I use to add extra light to the foreground and to any of the other objects in the composition (like the tree in the first photograph in this article.
The rules:
once you get your background exposure correct don't change it
if the figure is too bright, reduce the amount of light on it - you do this by reducing how long you shine your torch on the model
if the figure is too dark, increase the amount of light on it - shine the light on the model for longer
if you move closer to the subject with your torch you are increasing the amount of light on the subject
if you move further away from the subject with your torch you are decreasing the amount of light on the subject
initially stay the same distance away from your subjects to remove this variable
practice, practice, practice - "Practice does not make perfect. Perfect practice makes perfect" - Vince Lombardi ;)
It is inevitable that your subject will move during this process. It is part of the process and needs to be embraced. Have a really close look at my examples and you will see the delightful movement in the figures. I think they really add to the technique.
Our yellow wiggle poses with a giant fig. Shorter exposures mean their is less movement with the subject.
Light painting is a slow and laborious exercise that creates amazing results. I have found that in a three hour session we might only create 12 images and only one or two worthwhile ones. Despite this it is well worth the effort. Keep an eye on your model and keep them warm, with hot drinks & sugar and rug them up between images. If they get too cold it is time to go home.

getting to know your camera
The original post about camera cuddle. This has also been written up as a weekly exercise.
Learning about your camera until it becomes second nature is one of the keys to becoming a better photographer. There are two tried and true methods of doing this; study and practice. You should do a lot of both. It also helps if you can learn to love your camera. I have written about this before (you can read this here). Reading the manual is an unfortunate place to start as we would love to just pick the camera up and start. Putting the camera in auto mode and going for it, is a legitimate way to progress. Unfortunately you will still need the manual to even work out which mode this is. Many manuals are now included only as pdf files. I put mine on my phone, pad and in a folder in my computer / laptop so that I can reference it wherever I am. Years past and for those that have been lucky enough to get a a printed manual with your camera I recommend packing it into your camera bag and having it handy. It can take years to delve into the full capabilities of modern cameras. You may never even get there.
Some of my students have found the language of these so called manuals to be quiet difficult to understand, which in turn confuses flow charts and settings. This probably is an end product of translating them from their native tongue. Students have reported that third party manuals can overcome this problem. The third party authors task is to write a manual that helps the photographer understand what is going on with their camera and how to use it. I know that a few of my students have found a deeper understanding from these manuals. For some cameras online tutorials / workshops / courses are available for some common specific models of camera. Make sure you purchase the right one for your camera.
Here is a list of things I think you need to be able to do to take your photography to the next level:
Change the aperture or shutter speed when the camera is in various modes
Select aperture priority or shutter priority & change the aperture or shutter speed when the camera is in both of these modes
Set & change ISO
Set auto ISO upper limit
Change exposure compensation
Change & move the focus point /s
Change the metering mode
Change and understand each mode
Do all of these things without removing your eye from the viewfinder
Now if you don't know how to do these things, go and figure them out and practice, practice and practice.
How to practice?
Camera cuddle (adapted from original exercise by Bruce Barnum)
Go and sit or lay down in your favourite couch / lounge / chair or bed even. And hold your camera and play with it. For the first hour don't take a photograph. Just practice changing settings, over and over and over. Change them with your eyes closed. Change them while your looking through the viewfinder. Change them with the camera under a sheet or towel. Changing the aperture / shutter speed combination, exposure compensation and focus points needs to become second nature.
Take some time to really concentrate on each of your adjustment wheels, knobs, etc. Really feel them, can you tell the difference between them by just feeling or by their location. Get to know which way they turn. The more in touch you are with your camera the better.
Bruce describes this process with a large format camera, and this exercise is extended to having it in its bag, putting up the tripod, assembling the camera and adjusting all movements., inserting the film and taking picture with an empty double dark slide. Then putting it all away again and starting again. He recommends figuring out a system and sticking to that system.
Continue to practice until you can change things without thinking or looking.
After photographing most of my life if I don't use a camera for a few months or years I find I have forgotten all of the little nuances of operating the camera. It is amazing how many times I have forgotten to lock down my camera before shooting because it has been a few months since I last used that particular camera. I still practice, practice and practice. Now days the easiest way to practice is to go and take more photographs, regularly.
Lounge lizard
Now you know your way around a little it is time to start practicing taking photographs. The easiest way is to limit yourself with your subject so you can concentrate on your camera and the picture taking process.
For an hour take photographs from your lounge. Take some with wide open apertures, closed apertures, fast shutter speeds and slow shutter speeds. Use exposure compensation to get your exposure just right. Now go and have a look through your images and find a few good ones.. What settings did you have them on. Which images are blurry - check the shutter speed and the focal length of your lens. Make some notes / make generalisations / rules even (ie I can hand hold my 50mm lens at 1/30 second and still get sharp pictures)
Repeat this exercise on another day.. and even another one
If you must try a different chair in a different room in the house and repeat.

Len Metcalf with his Techinica III circa 1950